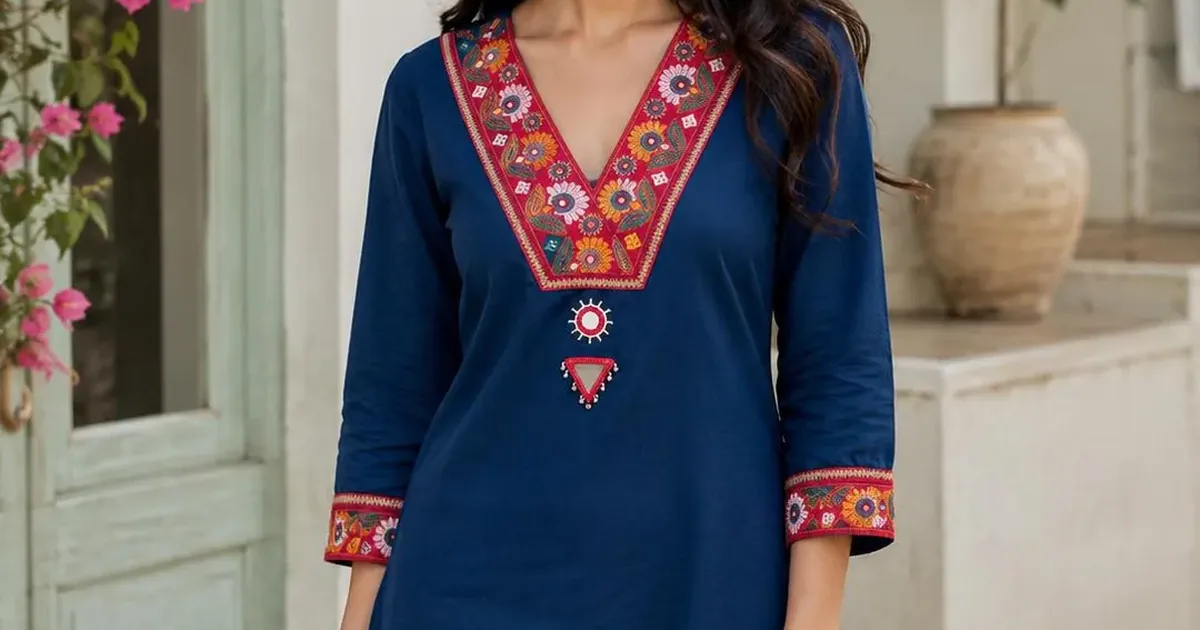
DIY Embroidered Kurti: Turn a Plain Kurti Into a One-of-a-Kind Piece
Two years ago I bought a plain cream cotton kurti from Ichhra Bazaar in Lahore for PKR 1,850. Nothing wrong with it (straight cut, side slits, three-quarter sleeves), but it was the kind of garment you forget you’re wearing.
It sat in my wardrobe for four months until one rainy evening I pulled it out, sketched a marigold-and-vine motif on paper, and decided to embroider the neckline. Eleven evenings later I had a kurti that strangers stopped me to ask about. That’s the whole argument for this project in one story: a plain kurti plus a hoop and some thread becomes something no shop can sell you.
This guide walks you through exactly how I did it, and how I’ve since done it five more times, each one faster and cleaner than the last.
You’ll get real measurements, the exact materials I buy in local markets, the stitch combinations that hold up to washing, and the mistakes that cost me two ruined yokes before I learned better.
Why Embroider a Kurti Yourself Instead of Buying One Ready-Made
Walk through any bazaar and you’ll find “embroidered” kurtis where the “embroidery” is glued-on lace or machine chain-stitch that unravels after three washes.
Hand embroidery is different: the stitches sit in the fabric, not on it, so they survive years of wear. My first embroidered kurti has been washed roughly forty times and the neckline still looks crisp.
There’s also the fit question. Ready-made embroidered kurtis force you to choose between a design you love and a cut that suits you.
When you embroider a kurti you already own, the fit is settled, you only add the beauty. And cost-wise, the maths is friendly: a plain lawn kurti (PKR 1,500–2,500) plus PKR 400–600 of thread and notions gives you a piece that looks like the PKR 6,000–8,000 boutique versions.
What You’ll Need: The Full Materials List
Buy everything before you start. Nothing kills momentum like running out of the right needle mid-motif.
| Material | Specification | Qty for one kurti | Approx. cost (PKR) |
|---|---|---|---|
| Plain kurti | Cotton or lawn, light-to-medium colour, pre-washed | 1 | 1,500–2,500 |
| Embroidery thread | Stranded cotton floss (Anchor or DMC); 8.7 m skeins | 6–10 skeins | 60–90 each |
| Crewel needles | Size 7 (medium) and size 9 (fine detail) | 1 pack | 120 |
| Embroidery hoop | 15 cm (6 inch) wooden or plastic, screw-tension | 1–2 | 250–400 |
| Water-soluble pen | Blue, fine tip, vanishes with water | 1 | 150 |
| Small sharp scissors | Embroidery snips | 1 | 300 |
| Iron-on interfacing (optional) | Lightweight fusible, for thin lawn | 0.5 m | 200 |
On thread: I use 2 strands for outlines and 3 strands for filled petals on medium-weight cotton. One strand looks elegant on fine lawn but doubles your stitching time, so reserve it for tiny detail work.
A single 8.7-metre skein yields roughly 60–80 cm of usable working length per cut (never cut longer than 45 cm, it tangles and wears thin), which translates to about 25–30 small flowers per skein at 3 strands.
Picking the Right Kurti to Embroider
Not every kurti is a good candidate. The fabric decides how pleasant the stitching will be and how long the result lasts.
| Fabric | Weave | Embroidery-friendliness | Notes |
|---|---|---|---|
| Cotton cambric | Medium, even | Excellent | My top pick — needle glides, stitches sit evenly |
| Lawn | Fine, light | Good with interfacing | Fuse lightweight interfacing behind the motif area |
| Khaddar | Coarse, textured | Good for bold designs | Use chunky stitches; fine detail gets lost |
| Linen | Loose, slubby | Moderate | Beautiful texture, but stitches can sink between threads |
| Chiffon/georgette | Sheer, slippery | Difficult | Skip for your first project, needs stabiliser and patience |
Colour matters too. Medium tones (teal, mustard, rust, sage) make thread colours pop and hide the occasional uneven stitch. Pure white shows every wobble; black swallows detail unless you use high-contrast thread. My cream kurti was forgiving in exactly the right way.
Designing Your Embroidery: Where to Stitch
A kurti gives you three natural “frames”. You don’t need all three, one well-executed zone beats three crowded ones.
The neckline
This is the highest-impact area because eyes land here first. For a V or round neckline, design a motif band 5–8 cm deep following the neckline curve, starting 1 cm below the stitched edge.
I draw the curve on paper first, then transfer it with the water-soluble pen using the neckline seam as my guide. A symmetrical floral vine (stem in stem stitch, leaves in fishbone or satin stitch, French-knot flower centres) is the classic for a reason: it reads beautifully from two metres away.
Sleeve cuffs
Echo the neckline motif at a smaller scale. A 3–4 cm border of running stitch with small lazy-daisy flowers, placed 2 cm above the cuff hem, ties the whole garment together.
This took me one evening per sleeve on my first kurti. Keep the design identical on both sleeves, asymmetry here looks like a mistake, not a choice.
Hem and side slits
A scattered motif (small flowers or paisleys spaced 8–10 cm apart) along the front hem, 5 cm above the edge, adds movement when you walk.
This is optional and adds roughly 6–8 hours, so I only do it when the kurti is otherwise very plain. The side slit edges can carry a simple running-stitch line in a contrast colour, 20 minutes of work that looks surprisingly tailored.
The Process, Step by Step
- Wash and press the kurti first. Cotton shrinks 2–3% on the first wash. Embroidering before washing guarantees puckering later. Press with steam so your transfer lines go onto a flat surface.
- Stabilise if needed. For lawn or any fabric you can see light through, fuse a piece of lightweight interfacing (cut 2 cm larger than your design on all sides) to the wrong side behind each motif zone. This single step prevents 90% of puckering.
- Transfer the design. With the water-soluble pen, draw directly on the fabric using the neckline seam and a ruler as guides. For symmetrical designs, draw one half, fold the kurti along the centre line, and press lightly to indent the mirror image, then trace it.
- Hoop a section. Place the 15 cm hoop over the design area, fabric taut like a drum skin — tap it; it should sound faintly hollow. Re-hoop as you move along the neckline; never try to stitch a 40 cm curve in one hooping.
- Stitch outlines first, fills second. Work all stem-stitch stems and backstitch outlines across the whole motif before filling a single petal. This keeps your tension consistent and lets you spot spacing errors early, when they’re still easy to adjust around.
- Secure threads properly. No knots on garment embroidery, they create bumps that irritate skin and pop through to the right side in the wash. Start with two tiny backstitches on the wrong side; end by weaving the tail under 4–5 existing stitches.
- Finish and press. Rinse out the pen marks with plain cold water, roll the kurti in a towel to remove moisture (never wring embroidered fabric), dry flat, then press from the wrong side with a pressing cloth over the embroidery.
Stitches That Work Best on Kurtis
| Stitch | Best used for | Difficulty | Speed |
|---|---|---|---|
| Stem stitch | Stems, vines, outlines | Easy | Fast |
| Backstitch | Lettering, fine outlines | Easy | Fast |
| Satin stitch | Petals, leaves (filled) | Medium | Slow |
| Fishbone stitch | Leaves | Medium | Medium |
| Lazy daisy | Small flowers, buds | Easy | Fast |
| French knot | Flower centres, dots | Medium | Medium |
| Chain stitch | Bold outlines, borders | Easy | Fast |
My go-to combination for a first kurti: stem stitch + lazy daisy + French knots. Three stitches, learned in an afternoon, capable of genuinely beautiful florals. Save satin stitch for your second project, it demands perfectly even tension and shows every inconsistency on a garment that moves.
Mistakes I Made So You Don’t Have To
Mistake 1: I skipped interfacing on lawn. My second kurti was a beautiful mint lawn. I embroidered the neckline directly, and it looked perfect, until the first wash, when the whole yoke rippled like a ruffled chip. Interfacing is non-negotiable on anything lighter than cambric.
Mistake 2: I used a red thread without testing it. A deep red Anchor skein bled pink streaks into the cream fabric on first wash.
Now I soak every dark or red skein in cold water for 10 minutes before stitching; if the water tints, that skein gets used on dark fabrics only. Thirty seconds of prevention.
Mistake 3: I hooped too tightly and stretched the neckline. Cranking the hoop screw warps knit-adjacent weaves and biases. The neckline of kurti number three sat 1.5 cm wider on one side. Drum-taut, not stretched, and never hoop across a seam under tension.
Mistake 4: I knotted my thread ends. The knots pressed against my collarbone all day and two of them worked through to the front after washing. Weave your ends. It takes ten extra seconds per thread and the difference in comfort is enormous.
Washing and Caring for Your Embroidered Kurti
Turn it inside out, wash cold (30°C max) with mild detergent, and skip the dryer entirely — line-dry in shade. Direct sun fades cotton floss faster than you’d expect; my mustard-yellow motifs lost noticeable warmth after one summer of sunny line-drying.
Press from the wrong side with a cloth between iron and embroidery. Treated this way, hand embroidery outlasts the kurti itself, my oldest piece is on its third year and the stitching still looks new even as the fabric softens.
Related guides
Dupatta Styling & Embroidery Ideas: Make Every Drape Count — for styling the finished kurti; Phulkari Embroidery: Complete Technique Guide — for phulkari embroidery to add.
Frequently Asked Questions
How long does it take to embroider a kurti neckline?
A 5–8 cm deep floral band around a standard neckline takes a confident beginner 8–12 hours of stitching. I spread mine over a week of evenings, about 90 minutes a night. Cuffs add 2–3 hours; a hem border adds 6–8.
Can I embroider a stitched/ready-made kurti, or should I embroider the fabric panels before stitching?
Embroidering the finished kurti is easier for beginners, no pattern-matching, and you see the final look immediately. Tailors who embroider before stitching do it for production speed, not quality. The only real constraint: keep your hoop away from seams and buttons.
What do I do if I make a mistake mid-motif?
Unpick with a seam ripper from the wrong side, working stitch by stitch, never yank. Small errors (a petal slightly off) are usually invisible at arm’s length; I leave anything I can’t see from one metre away. Perfectionism is the enemy of finished garments.
Will the embroidery make the kurti uncomfortable to wear?
Not if you keep the stitching flat. Avoid raised stitches (like bullion knots) on areas that touch skin, necklines and underarms. Satin stitch and stem stitch lie flat and feel like part of the fabric.
Can I embroider over a printed kurti?
Yes, and it’s a great shortcut: use the print as your design guide, outlining printed flowers with stem stitch and adding French-knot centres. It looks like expensive embellished fabric and takes half the design time.
Key Takeaways
- Start with a medium-weight cotton kurti in a mid-tone colour — the most forgiving combination for beginners.
- Fuse lightweight interfacing behind the design area on any fabric lighter than cambric.
- Test dark and red threads for colourfastness before stitching; soak 10 minutes in cold water.
- Master three stitches (stem, lazy daisy, French knot) before attempting satin stitch on a garment.
- No knots on wearable embroidery, weave thread ends under existing stitches on the wrong side.
- Wash cold, inside out, line-dry in shade; press from the wrong side through a cloth.
Total project cost for my first kurti: PKR 1,850 (kurti) + roughly PKR 550 (threads and notions I didn’t already own) = PKR 2,400 and eleven evenings. I still wear it weekly, and it still gets compliments. That’s the quiet economics of hand embroidery, the value isn’t in the money saved, it’s in a garment nobody else on earth owns.



2 Comments