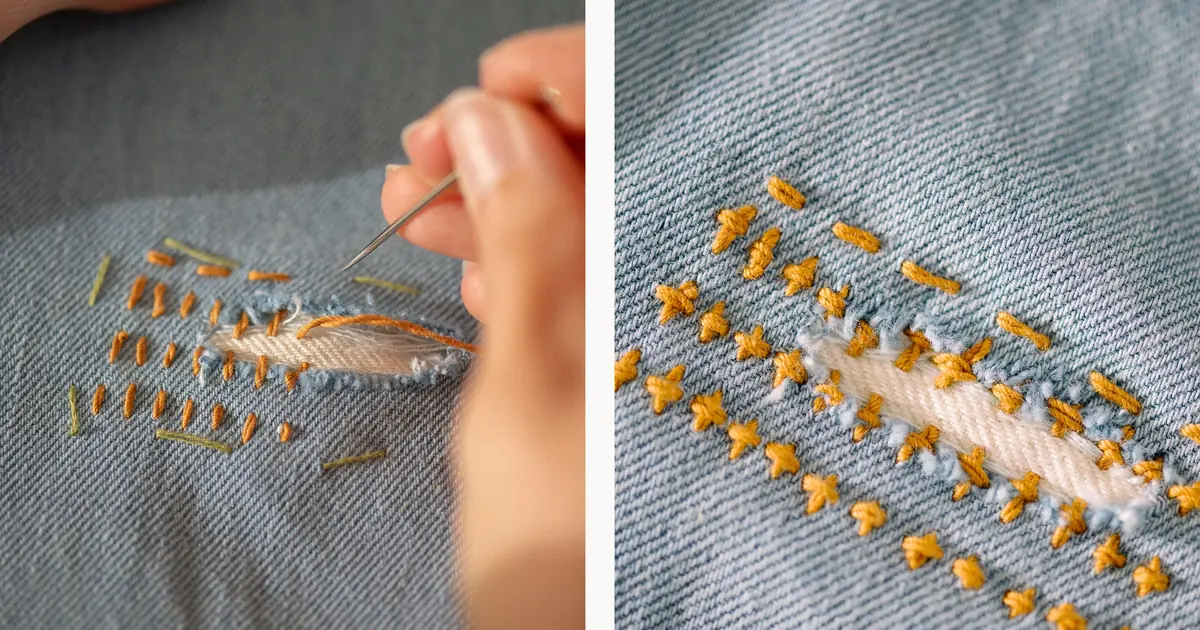
Sashiko Visible Mending Guide
I own a pair of jeans with sashiko stitching across both knees, and they get more compliments than anything else I wear, which is funny, because the stitching exists to cover the places where the jeans wore through.
That’s the whole philosophy in one garment: the repair isn’t hidden, it’s celebrated. The Japanese call this impulse mottainai (regret at waste), and sashiko is its needlework expression: strengthen the cloth, and let the strengthening be beautiful.
Sashiko (“little stabs”) is Japanese running-stitch embroidery, traditionally white thread on indigo cloth, that began as functional reinforcement (fishermen’s coats, farmers’ jackets, firemen’s coats layered and stitched for strength), and evolved into a refined geometric art.
In its modern incarnation as visible mending, it’s also the most useful embroidery a practical person can learn: it extends the life of clothes by years while making them more personal. This guide teaches both the craft and the mending.
Two Traditions, One Stitch
| Moyozashi (pattern sashiko) | Hitomezashi (one-stitch sashiko) | |
|---|---|---|
| Character | Pictorial and geometric motifs stitched as outlines | Patterns emerge from dense grids of straight stitching |
| Classic motifs | Seigaiha (waves), asanoha (hemp leaf), kakuShippo, bishamon | Sayagata, yamabishi, amime from grid intersections |
| How the pattern forms | You follow the motif’s lines | The pattern appears where rows cross, stitch straight lines, get geometry free |
| Best for beginners | Yes, intuitive, forgiving | Yes, meditative, but demands even spacing |
For visible mending, you’ll mostly use simple running stitch in straight or gently curved rows — closer to hitomezashi’s spirit. For decorative panels, moyozashi motifs give you the classic sashiko look. Learn both; they share hands.
Materials: The Honest Kit
- Sashiko thread: a matte, loosely twisted cotton thread, heavier than floss, it sits on the fabric rather than sinking in, which is the whole visual point. Buy actual sashiko thread; embroidery floss is too fine and too shiny for the authentic look.
- Sashiko needles: long, with a large eye, the length lets you load many stitches at once, which is where the rhythm comes from. A standard sashiko needle is noticeably longer than a crewel needle.
- Fabric: traditionally indigo-dyed cotton or linen; for mending, the garment itself plus a patch. For practice, any medium-weight cotton in a dark color with white thread gives the classic contrast.
- Marking: a water-soluble pen, chalk, or (best for beginners) pre-printed sashiko fabric with wash-away patterns. There’s no shame in printed guides; even professionals use them for complex motifs.
- Thimble: sashiko’s long needles and multiple layers reward a thimble. The traditional yubinuki is worn on the middle finger, but any thimble that fits works.
The stitch ratio
Classic sashiko uses a 3:2 ratio, the visible stitch is roughly 3 units, the gap 2 units (or sometimes described as stitch slightly longer than the space). Longer stitches than gaps: that’s what gives sashiko its distinctive dashed-line look versus kantha’s finer texture. Keep the ratio consistent and your work will read as sashiko instantly.
The Technique
Loading the needle
The signature move: instead of stitching one stitch at a time, you pleat the fabric onto the needle (weave the needle in and out for 4–8 stitches) then pull through in one smooth motion.
This is what makes sashiko fast and rhythmic. The fabric bunches on the needle; you smooth it flat after each pull. Beginners try to pull after every stitch; resist. Load, then pull.
Turning corners and curves
At sharp pattern corners, take a tiny backstitch or loop the thread around the corner point to keep the line crisp. On curves, shorten your stitches, long stitches chord across curves instead of following them. This single adjustment is the difference between fluid waves and polygon waves.
Where rows meet
In hitomezashi grids, crossing rows should interlace cleanly — don’t stitch through a crossing thread, lay your new row’s stitches to alternate over/under or simply butt neatly. In traditional work, intersections are precise; sloppy crossings are the visible mark of rushing.
Visible Mending with Sashiko: The Practical Method
This is the highest-value skill here. A worn knee, a torn pocket, a thinning elbow, here’s the method:
Step 1 — Assess and stabilize
Trim frayed threads. If the hole is large or the surrounding fabric is weak, you’ll patch; if it’s a small hole or thin spot in otherwise sound fabric, you can stitch directly (called darning-style reinforcement).
Step 2 — Choose the patch
Cut a patch of similar-weight fabric extending at least 2 cm beyond the damage on all sides. Traditional mending uses contrasting fabric (visible!), but tone-on-tone is equally valid. Pre-wash the patch. Place it behind the garment fabric (inside).
Step 3 — Baste
Baste the patch in place with large stitches, smoothing both layers flat. For knees and elbows, baste while the garment is shaped as-worn if possible, flat-basted patches can pull when the joint bends.
Step 4 — Stitch the sashiko
Work rows of running stitch across the damaged area and well into the sound fabric around it, the stitching should extend past the damage by several centimeters in every direction, because the stitching is the reinforcement, not just the patch.
Use the 3:2 ratio, keep rows parallel (mark guide lines with chalk), and let the rows extend into a deliberate pattern: parallel lines, a grid, radiating lines from the hole’s center.
Step 5 — Finish
End threads by weaving under existing stitches on the patch side. Remove basting. Press. The mend should feel like a reinforced panel, slightly stiffer than the surrounding fabric, which is exactly right. Wear it proudly; the Japanese tradition holds that a well-mended garment has more dignity than a new one.
Design principles for mends
- Extend beyond the damage. Stitching only the hole’s edges doesn’t reinforce; the load must spread into sound fabric.
- Follow the garment’s lines. Rows parallel to a seam or pocket edge look intentional; random angles look accidental.
- Repeat the motif. Mend one knee with a radiating pattern? Do the other knee to match, even if it’s intact — symmetry reads as design.
- Contrast is a choice. White on indigo is classic and bold; tone-on-tone is subtle and sophisticated. Both are “visible mending”, visibility is about honesty, not loudness.
Classic Motifs to Learn
- Seigaiha (blue ocean waves): overlapping concentric arcs, the most recognizable sashiko motif, endlessly repeatable.
- Asanoha (hemp leaf): geometric star/polygon, looks complex, builds from straight lines on a grid.
- Hishi (diamond) variations: the backbone of hitomezashi, diamonds within diamonds.
- Kakuzashi / sayagata: interlocking geometric fret patterns — advanced, hypnotic.
Start with seigaiha on a practice square: it teaches curve control, spacing, and pattern repetition in one motif.
Mistakes Beginners Make
| Mistake | Why it matters | Fix |
|---|---|---|
| Stitches too long | Snag, wear, and look sloppy | Honor the 3:2 ratio; shorter on curves |
| Pulling too tight | Fabric puckers; mend won’t lie flat | Ease tension; the thread should rest on the surface |
| Mending only the hole | Repair fails at the edges under stress | Extend stitching well into sound fabric |
| Skipping the baste | Patch shifts mid-stitching | Baste generously; it’s five minutes that saves an hour |
| Wrong thread | Floss sinks in and looks anemic | Use real sashiko thread, the loft is the look |
Care
Wash mended garments inside-out on gentle; the sashiko stitching is durable but the patch edges appreciate kindness. The indigo tradition expects fading, sashiko on jeans evolves with wear, and the contrast softening over time is part of the aesthetic, not damage. Re-stitch any loosened rows promptly; maintenance is the philosophy, after all.
Takeaways
- Sashiko is running stitch with discipline: the 3:2 stitch-to-gap ratio and even spacing create the signature look.
- Load multiple stitches on the long needle before pulling, that’s the rhythm and the speed.
- For mending: patch behind, stitch beyond the damage, and extend the pattern into sound fabric.
- Use real sashiko thread, its matte loft sitting on the fabric surface is the visual signature.
- Visible mending is a philosophy: repair as celebration, waste as regret, the mended garment as more dignified than the new.
Related guides
Visible Mending Masterclass — for more visible-mending ideas; Kantha Stitch Guide for Beginners — for kantha, another running-stitch tradition.
Frequently Asked Questions
Is sashiko hard to learn?
It’s one of the easiest embroideries to start — one stitch, no complex manipulations. What it demands is consistency: even stitches, even gaps, straight rows. Most people produce respectable work within their first evening; refined work takes the usual years.
Can I sashiko-mend stretchy or knit fabrics?
It’s trickier, knits distort under running stitch. Stabilize the area first with a woven patch behind and keep stitches small and loose, or use the mend as decoration on a stabilized panel. Woven garments are the natural home of sashiko mending.
What’s the difference between sashiko and kantha?
Both are running-stitch traditions, but sashiko is geometrically disciplined (formal pattern families, precise ratios, usually white on indigo) while kantha is improvisational and narrative (freehand motifs, varied colors, layered recycled cloth). See our Kantha Stitch Guide for Beginners for the full comparison.
How long does thread last in a knee mend?
Cotton sashiko thread on a high-friction area like a knee typically lasts 1–3 years of regular wear before needing reinforcement, and re-stitching over the existing pattern is a five-minute job. The mend is maintainable by design.
Do I need traditional indigo fabric?
No, the technique works on any stable woven. Indigo and white is the iconic look, but sashiko in other colorways (charcoal and gold, natural linen and rust) is thoroughly in the tradition’s spirit. The geometry is the tradition; the colors are your voice.


One Comment