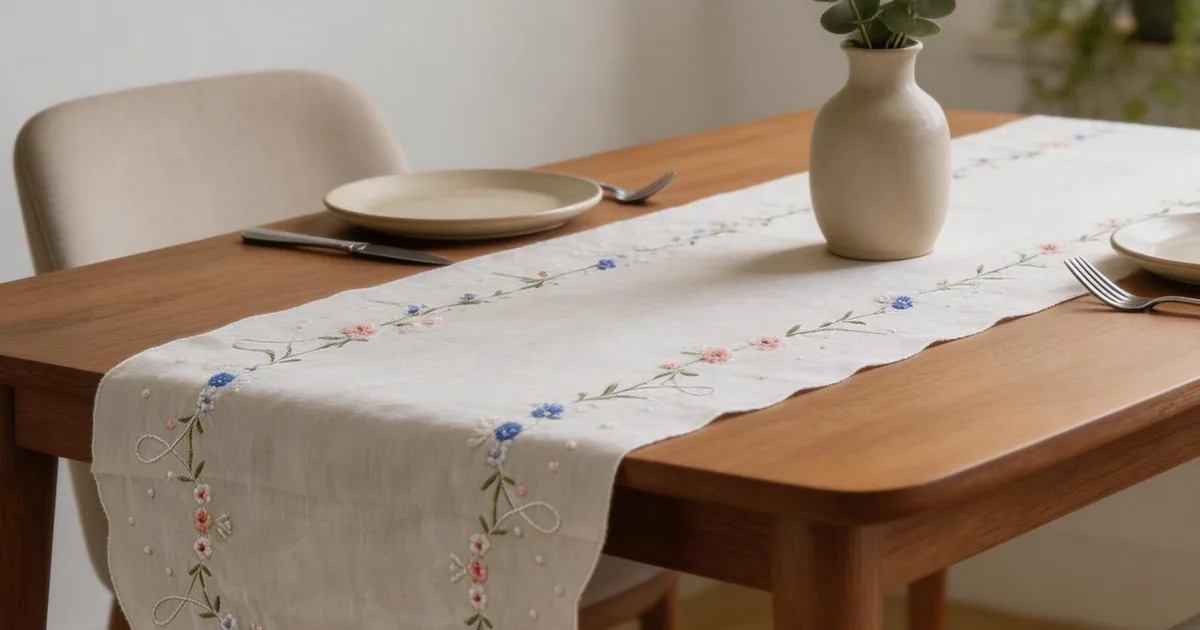
Table Runner Embroidery for Beginners
The first “real” embroidery project I ever finished was a table runner — not a hoop sampler, not a bookmark, but something my family actually used.
It was a plain white cotton runner, 180 cm long, with a simple vine border I’d stitched in green and a few lazy-daisy flowers. It wasn’t perfect (the vine wobbled in one corner where I’d stitched while half-asleep), but it lived on our dining table for six years. When people ask me what project a total beginner should start with, I still say: a table runner. Here’s why, and exactly how.
Why a Table Runner Is the Best Beginner Project
Beginners need three things: a project that’s hard to mess up structurally, big enough to feel substantial, and useful enough to motivate finishing. A table runner delivers all three.
It’s a rectangle, no shaping, no fitting, no garment construction. The standard size (35 × 180 cm) gives you long, satisfying stretches of repetitive stitching where your hands learn the rhythm. And unlike a sampler that gets filed in a drawer, a runner goes straight onto the table, where every meal reminds you that you made it.
It also teaches the single most important beginner skill without you noticing: consistent stitch length over distance. A 180 cm border of stem stitch will train your hands better than any practice cloth, because you care about the result.
Materials: The Complete List
| Material | Specification | Quantity | Approx. cost (PKR) |
|---|---|---|---|
| Runner fabric | Medium cotton or cotton-linen, 40 cm wide | 2 metres | 800–1,200 |
| Embroidery thread | Stranded floss: 1 green, 2–3 flower colours, 1 accent | 8–10 skeins | 60–90 each |
| Crewel needles | Size 7–8 | 2–3 | 120/pack |
| Embroidery hoop | 20 cm | 1 | 350 |
| Water-soluble pen | Fine tip | 1 | 150 |
| Metre ruler | For marking long straight lines | 1 | 200 |
Fabric choice deserves care because a runner gets washed more than any wall hanging and handled more than most garments. Choose a medium-weight cotton (around 150–180 GSM) in white, cream or natural, light colours show off thread beautifully and bleach clean if stained.
Avoid very dark fabrics for a first runner: marking lines are hard to see and mistakes show as light scratches in the weave. Pre-wash and press the full 2 metres before you mark anything; a runner that shrinks 3% after you’ve stitched 180 cm of border will ripple along its entire length.
Sizing Your Runner
| Table type | Runner width | Runner length | Overhang each end |
|---|---|---|---|
| 4-seat dining | 35 cm | 180 cm | 25–30 cm |
| 6-seat dining | 35–40 cm | 220 cm | 25–30 cm |
| Coffee table | 30 cm | 120 cm | 15–20 cm |
| Sideboard/console | 30 cm | 150 cm | 10–15 cm |
Cut the fabric 4 cm longer and wider than the finished size (2 cm hem allowance per side). The classic 35 × 180 cm runner therefore starts as a 39 × 184 cm cut.
Hem all four sides with a simple double-fold hem (fold 1 cm, press, fold 1 cm, stitch), machine or hand, your choice; I hand-hem runners because the 10 minutes per side is peaceful work and invisible from the top.
The Design: A Vine Border With Flowers
This is the design I teach in every beginner workshop, refined over a dozen classes. A stem-stitch vine runs the full length of both long borders, 5 cm from the edge; lazy-daisy flowers bloom at intervals; French-knot centres and scattered buds fill the gaps. Three stitches, infinite charm.
Marking the border (the key step)
Measure 5 cm from each long edge and draw a guideline the full length with the metre ruler, this is your vine line.
Then mark flower positions every 15 cm along the line: for a 180 cm runner, that’s 12 flowers per side (180 ÷ 15), starting and ending 7.5 cm from each short end so the corners balance. Count twice, mark once. Uneven flower spacing is the single thing that makes beginner runners look amateur, and it’s entirely preventable with a ruler.
The corner solution
Corners defeat beginners: the vine has to turn 90 degrees and flowers collide.
My rule: stop the vine 5 cm before each corner and place a single statement flower (larger, 4 cm, with extra petals) exactly in the corner zone. The vine doesn’t turn — it ends gracefully into a flower at each end. Clean, simple, professional-looking.
Stitching It: The Rhythm of a Long Border
- Hoop one section. With a 20 cm hoop you’ll cover about 18 cm of border per placement, roughly 10 hoopings per side. Mark your progress with a pin so you don’t lose your place between sessions.
- Stem-stitch the full vine first. Work the entire 180 cm vine on one side before adding a single flower. Use 3 strands of green, 4–5 mm stitches. This is 3–4 hours of pure rhythm, put on a podcast. Your tenth metre of stem stitch will look noticeably better than your first; that’s the training working.
- Add leaves. Small lazy-daisy leaves (2 strands, 1.5 cm) alternating sides of the vine every 5 cm. Don’t overthink placement, natural vines are irregular.
- Stitch the flowers. At each 15 cm mark: 6 lazy-daisy petals (3 strands, 2 cm petals) in your main flower colour, 3 French knots in the accent colour at the centre. Alternate your two or three flower colours along the border for a garden feel, or use one colour for a formal look.
- Scatter buds and dots. Between flowers, add 3-petal buds and single French-knot dots. This filler work is what separates “nice” from “lush”.
- Repeat on the second border, then stitch the four corner flowers.
Total stitching time: 14–18 hours. I did mine in 45-minute morning sessions over three weeks. The repetition is the point, by the end, your stem stitch will be automatic.
Beginner Stitch Guide
| Stitch | Where it’s used | Strands | Beginner tip |
|---|---|---|---|
| Stem stitch | The vine | 3 | Always keep the working thread below the needle for a consistent rope effect |
| Lazy daisy | Petals and leaves | 2–3 | Don’t pull the anchoring tack too tight or the petal puckers |
| French knot | Flower centres, dots | 2 | Two wraps; hold wraps snug while pulling through |
Three stitches is a deliberate limit. Every additional stitch type you add to a first project multiplies the learning load and the visual chaos. Master these three on a runner and you’ll be ready for anything.
Mistakes I Made So You Don’t Have To
Mistake 1: I didn’t pre-wash the fabric. My first runner rippled along the stitched borders after its first wash while the unstitched centre stayed flat — the fabric shrank, the thread didn’t. Pre-wash everything, always. I mention this in every article because it ruins more beginner projects than any other single cause.
Mistake 2: I eyeballed the flower spacing. Twelve flowers, and the last gap was 9 cm while the others were 15. It bothered me every time I set the table until I finally unpicked and re-spaced them. A ruler and five minutes of maths prevent this completely.
Mistake 3: I stitched the vine in sections out of order. I jumped around the runner stitching whatever section was in the hoop, and my stem-stitch direction reversed in places, making the vine look subtly striped.
Work each border in one continuous direction, your stitch slant stays consistent and the vine reads as one flowing line.
Mistake 4: I used 6 strands “to finish faster”. Six strands on medium cotton look lumpy, tangle constantly, and wear thin from repeated pulling through the fabric. Three strands maximum for outlines, two for detail. Speed comes from rhythm, not thread bulk.
Washing and Care
A table runner lives a harder life than you’d think, food spills, hot dishes, weekly washing. Machine wash warm (40°C) with like colours; treat stains promptly with dish soap before washing (it cuts grease better than laundry detergent).
Line-dry or tumble low; press while slightly damp from the wrong side with a pressing cloth. My six-year-old runner has survived roughly 200 washes, the greens have softened to a sage I actually prefer, and the stitching is intact. Cotton floss on cotton fabric, washed sensibly, is nearly indestructible.
Related guides
Embroidered Cushion Covers: A Weekend Project — for cushions to match the runner; Beginner Quilt Project with Hand Stitching — for a quilt in the same style.
Frequently Asked Questions
How long does a beginner take to finish a table runner?
14–18 hours of stitching for the design described here, plus an hour for hemming and marking. Most beginners spread it over 2–4 weeks of casual evening or morning sessions. Don’t rush it, the evenness of your stitching improves visibly across the project, and that’s a feature, not a flaw.
Can I use a different design, like geometric patterns?
Absolutely. A runner suits geometric borders beautifully, try a running-stitch diamond chain or a cross-stitch border (counted on even-weave fabric). The marking principles are identical: guideline, measured repeats, planned corners.
What if my table is glass? Does the back of the embroidery show?
Yes, and on glass it shows clearly. Keep your back neat (short carries, woven ends), or back the runner with a second layer of fabric, cut the lining 2 cm smaller all round, stitch it to the wrong side before hemming. A lined runner also protects the table from any thread texture.
Should the design go on both long borders or just one?
Both, for a dining table viewed from all sides. For a sideboard pushed against a wall, one border plus the two short ends is enough, nobody sees the back. Save yourself 7 hours when no one will look.
Can I embroider a runner as a gift? Any tips?
It’s an excellent gift — personal, useful, and clearly handmade. Measure the recipient’s table first (a runner that doesn’t fit is an awkward gift). Choose their kitchen/dining colour scheme over your own taste, and include a small handwritten care card. I’ve gifted four; all are still in use.
Key Takeaways
- A 35 × 180 cm cotton runner with a vine-and-flower border is the ideal first embroidery project: simple, substantial, useful.
- Pre-wash and press the full fabric length before marking, shrinkage after stitching causes rippling.
- Mark with a ruler: 5 cm border guideline, flowers every 15 cm, counted to fit evenly.
- End vines into corner flowers instead of turning corners, cleaner and easier.
- Three stitches (stem, lazy daisy, French knot) are enough; master them before adding more.
- Work each border in one continuous direction for a consistent stitch slant.
Six years on, my first runner’s vine still wobbles in that one corner, and I’ve never fixed it. It reminds me that the project taught my hands what no tutorial could: the feel of thread moving through cloth at a steady rhythm, for hours, toward something beautiful. Start your runner this weekend. Your table (and your hands) will thank you.


