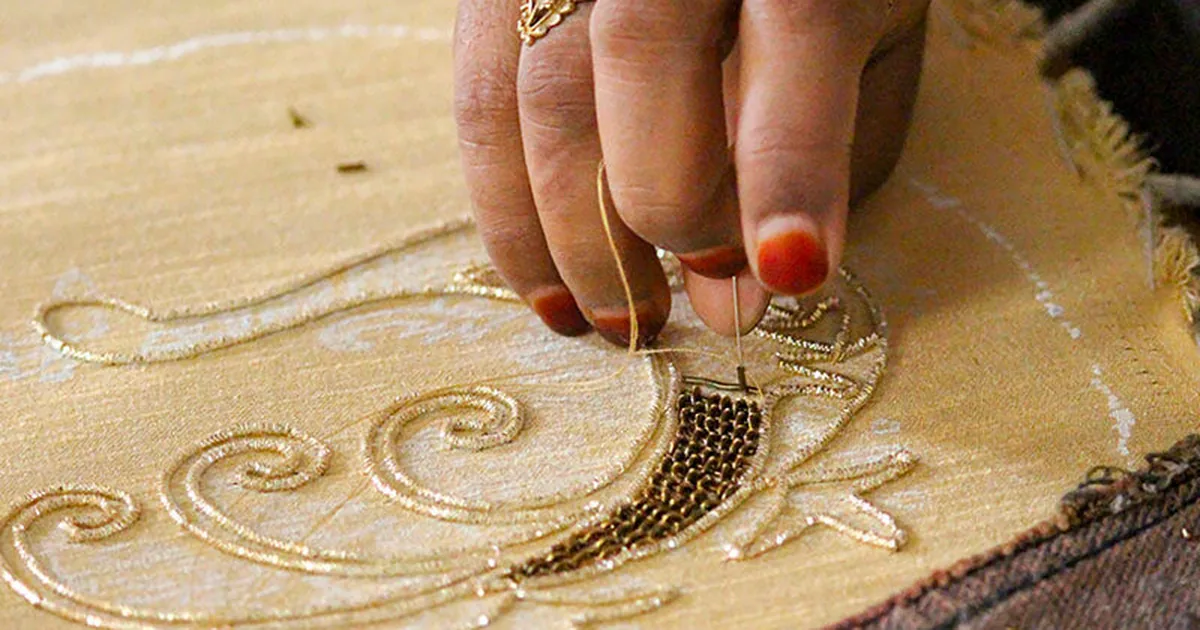
Zardozi Embroidery: Metallic Thread Mastery
I ruined my first zardozi thread within ten minutes. It was a length of dabka (the springy coiled wire thread), and I treated it like cotton floss: pulled it through the fabric, watched it kink, tried to straighten it, and ended up with a tangled brass slinky that went straight in the bin.
The artisan who later taught me the basics laughed and said the thing I now tell every student: metal thread is not thread. It’s wire that behaves like thread only if you respect that it’s wire. Everything about zardozi technique flows from that single understanding.
Zardozi is the art of embroidery with metal threads, gold and silver wire, coiled dabka, faceted nakshi, flat tilla, sequins (sitara), and beads, worked traditionally on rich fabrics like velvet, silk, and satin for bridal, formal, and ceremonial garments.
The word comes from Persian: zar (gold) + dozi (embroidery). It’s the most materially demanding embroidery in this series and the most spectacular when done well. Here’s the materials honestly, the core techniques practically, and the mistakes expensively.
The Materials: Know Your Metals
Zardozi’s vocabulary is its materials. Each behaves differently, and mixing them thoughtlessly is how beginners produce work that looks busy instead of rich.
| Material | What it’s | Character / use |
|---|---|---|
| Dabka | Thin metal wire coiled into a spring | The signature zardozi thread; cut into small lengths and couched down; creates raised, textured lines |
| Nakshi | Faceted/twisted wire, spring-like but with flat faces | Catches light in facets; used for outlines and detail |
| Tilla | Flat metal strip thread | Smooth, ribbon-like coverage; classic for borders |
| Sitara | Metal sequins | Scattered sparkle; sewn individually or in lines |
| Salma | Flat round metal spangles | Subtler than sitara; traditional accents |
| Beads / pearls | Glass, metal, or pearl beads | Raised detail, flower centers, edges |
| Gota | Metal ribbon appliqué (related craft) | Often combined with zardozi on bridal wear |
Real gold/silver wire (kalabattu) versus imitation: genuine metal thread is softer, tarnishes gracefully, and costs accordingly.
Modern “zardozi” overwhelmingly uses gold- and silver-plated copper wire or metallized polyester — perfectly respectable for learning and for most garments, but know what you’re buying. For practice, buy the inexpensive copper-based dabka; your first several attempts are tuition, not product.
Tools and Setup
- The adda (frame). Traditional zardozi is worked on a large rectangular wooden frame (adda/khat) that holds the fabric drum-tight over a big area. For learning, a sturdy large hoop or slate frame works, but the fabric must be tight. Metal threads punish any slack.
- Needles: fine, strong, with eyes that won’t shred wire. Many zardozi workers use two needles, one to place the metal, one to couch it.
- Couching thread: strong cotton or silk in a matching tone. Almost all metal thread is couched (laid on the surface and tacked down) rather than pulled through the fabric, pulling wire through repeatedly kinks and dulls it.
- Backing: the ground fabric (velvet, silk, satin) is usually backed with a firm cotton for stability. Metal work is heavy; the ground must carry it.
- Small sharp scissors for cutting dabka lengths; beeswax for the couching thread.
Core Technique 1: Couching Dabka
This is the foundation of zardozi, perhaps 70% of the craft. Short lengths of dabka are laid along the design line and secured with tiny couching stitches.
Step 1 — Cut, don’t pull
Cut dabka into lengths matching your design segments — typically 1–2 cm for curves, longer for straight lines. Cut with sharp scissors; crushed ends fray and look messy. Never pull dabka through the fabric like thread.
Step 2 — Lay and tack
Position the dabka length along your design line. With a second threaded needle (fine, strong thread), take tiny stitches over the dabka and into the fabric at 3–4 mm intervals, pulling just snug enough to hold. The couching stitches should be nearly invisible, they dive into the coil’s grooves.
Step 3 — Join seamlessly
Butt the next length tightly against the previous one; the joint should disappear into the texture. On curves, use shorter lengths so the line bends smoothly instead of faceting.
The wire rule
Every handling principle for dabka: don’t bend it sharply, don’t pull it through fabric, don’t let lengths twist, and cut only what you’ll use in the next few minutes (cut lengths tangle if left loose). Respect the wire and it behaves beautifully.
Core Technique 2: Sequins and Beads
- Sequins (sitara): bring the needle up, thread a sequin, take the needle down just past the sequin’s edge so the stitch anchors it flat, or anchor with a tiny bead on top (sequin + bead = the classic combination, and the bead hides the anchoring stitch).
- Bead lines: string 3–4 beads on the working thread, lay along the design line, and tack down between beads with tiny couching stitches, the same principle as dabka couching.
- French-knot alternatives: in zardozi, texture dots are more often tiny coiled nakshi rings or bead clusters than thread knots, metal reads richer.
Core Technique 3: Raised Work (Wasli Padding)
The most luxurious zardozi is raised — motifs that stand proud of the fabric.
The traditional method pads the shape first (with felt, cotton cord, or layered wasli paper/card), then covers the padding completely with metal thread worked in close rows. The padding shapes are cut slightly smaller than the design and secured to the ground; then dabka or nakshi is couched in tight parallel rows over them until no padding shows.
For your first raised motif, pad a simple leaf or petal with two layers of felt, then cover with couched dabka in rows following the shape’s length. The result (a gleaming, sculptural leaf) is the moment zardozi clicks.
Designing for Metal
- Bold shapes win. Fine detail disappears in metal’s reflectivity; design with strong silhouettes, paisleys, florals, borders, medallions.
- Mix textures, not just materials. Matte beads against shiny dabka, flat tilla beside coiled nakshi, contrast of surface reads richer than contrast of color.
- Plan the weight. Dense metalwork is heavy. A fully zardozi’d bodice can weigh over a kilo, design accordingly, reinforce the ground, and warn the wearer.
- Leave breathing room. The most expensive-looking zardozi I’ve seen used metal sparingly against plain velvet. Restraint reads as luxury; coverage reads as costume.
Beginner Project: A Zardozi Motif Sampler
On a 25 × 25 cm piece of cotton velvet backed with firm cotton, work:
- A paisley outline in couched dabka (technique 1).
- A sequin-and-bead flower inside it (technique 2).
- A raised leaf with felt padding (technique 3).
- A tilla border line around the composition.
This single sampler teaches every core skill. Frame it (it’s genuinely beautiful), and keep it as your reference for tension and spacing.
Mistakes That Cost Money
| Mistake | Cost | Prevention |
|---|---|---|
| Pulling dabka through fabric | Kinked, dulled, wasted wire | Couch everything; cut lengths, never pull |
| Slack fabric in the frame | Puckered ground; uneven metal lines | Drum-tight framing; re-tension as you work |
| Cheap thread that tarnishes | Piece discolors in months | Buy from reputable suppliers; ask about plating |
| Over-ambitious first design | Wasted materials; discouragement | Sampler first; small motif second; garment third |
| Ignoring weight | Garment distorts; seams fail | Reinforce grounds; distribute dense work; interface |
| Touching with bare damp hands | Tarnish spots on metal | Clean dry hands; wash hands before long sessions |
Care of Metal-Thread Embroidery
Dry clean only, water, especially with detergents, tarnishes metal thread and can loosen couching. Store wrapped in washed muslin with anti-tarnish strips; never in plastic (trapped moisture accelerates tarnish).
Handle as little as possible, with clean dry hands. If couching loosens over years, it can be re-tacked by a skilled hand — metal embroidery is repairable, which is why antique pieces survive.
Takeaways
- Metal thread is wire: couch it, don’t pull it; cut lengths; never kink.
- Master three techniques, couched dabka, sequin/bead work, raised padding, and you hold the craft’s core.
- Work on a drum-tight frame over a reinforced ground; metal punishes slack.
- Design bold, mix textures, and respect the weight you’re adding to the garment.
- Practice on inexpensive wire first; dry-clean finished pieces; store against tarnish.
Related guides
Shisha (Mirror) Work Step-by-Step — for mirror work to pair with metallic thread; Blackwork Embroidery — for blackwork.
Frequently Asked Questions
Is zardozi too advanced for beginners?
The materials are unforgiving, but the techniques (couching, sequin attachment) are straightforward. A careful beginner can produce a respectable sampler in a weekend. What takes years is speed, consistency, and design judgment, not the basic moves.
Real vs. imitation metal thread — does it matter?
For learning: no, use imitation. For heirloom or bridal pieces: genuine plated wire ages better and has a depth of luster that synthetics can’t match. Price the difference into commissions honestly.
Why does my dabka keep kinking?
You’re handling it like thread — pulling, bending, letting cut lengths twist. Cut short lengths, lay them don’t pull them, couch immediately, and keep unused wire in its coil. Kinking is always a handling problem, never a material problem.
Can zardozi be machine-done?
Machines do “zardozi-style” chain-stitch embroidery with metallic thread, common in commercial bridal wear. Hand zardozi’s raised work, mixed materials, and texture variation remain hand-only. They’re different products at different prices, don’t confuse them when buying or commissioning.
How do I stop metal thread from tarnishing?
Anti-tarnish storage, minimal handling with clean dry hands, dry cleaning only, and silica gel in the storage box. Some tarnish over decades is natural and, on genuine silver-gilt, part of the antique beauty, fight the rapid kind, accept the slow kind.


