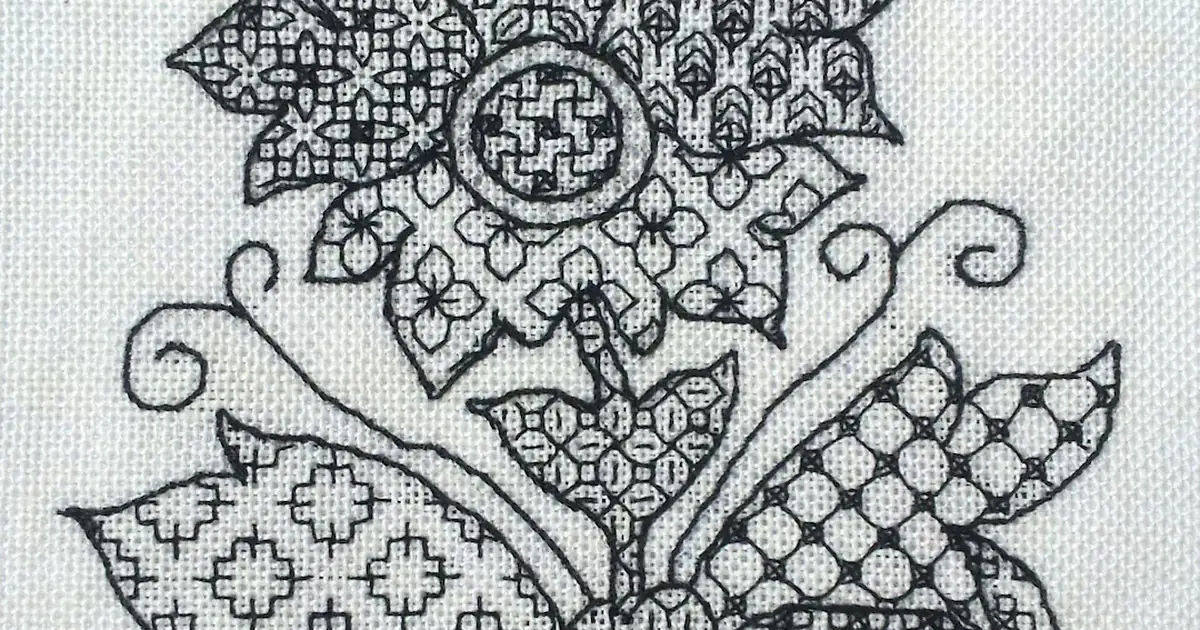
Blackwork Embroidery
The blackwork piece that stopped me in my tracks was a photograph, not a textile, a Tudor-era sleeve panel, black silk on white linen, the pattern so fine it looked printed until I zoomed in and saw the individual Holbein stitches marching in perfect formation.
I remember thinking: this is embroidery as drawing. No color to hide behind, no texture tricks, just line, density, and absolute control. I spent the next month teaching myself the double-running stitch, and it rewired how I think about every other embroidery I do. Blackwork doesn’t forgive, and that’s exactly why it teaches.
Blackwork is a counted-thread embroidery worked traditionally in black silk on white or natural linen, built from geometric repeating patterns.
It flourished in Tudor England (famously on the smocks and sleeves of the court), and its signature stitch, the Holbein stitch (double running stitch), produces a line that looks identical on front and back. Here is the stitch, the pattern logic, and how to start a craft that rewards precision above all.
What Blackwork Is
Strip away the history and blackwork is beautifully simple: black thread, white ground, geometric patterns built stitch by stitch on the fabric’s grid.
The patterns are diaper patterns — small repeating units (diamonds, stars, flowers, acorns, pomegranates) tiled across a band or field. Shading is created by density: areas of solid stitching read dark, open patterns read light, exactly like an engraving or a pen-and-ink drawing.
The historical note, briefly and honestly: blackwork’s Tudor associations are real. Spanish and Northern European influences converged in the English court, and portraits of the era show the distinctive black-on-white sleeves.
But geometric counted blackwork exists across cultures (it appears in North African, Middle Eastern, and Eastern European traditions too), so treat the Tudor story as one chapter, not the whole book.
The Signature Stitch: Holbein (Double Running) Stitch
This is the stitch that defines the craft. The Holbein stitch is worked in two passes:
Pass 1 — the journey out
Work a line of running stitch along your pattern line, stitch, gap, stitch, gap. Standard running stitch.
Pass 2 — the return
Come back along the same line, filling in every gap with a stitch. The result: a continuous, unbroken line that looks like backstitch on the front, but the back is identical to the front, a clean line with no carried threads.
Why does this matter? On historical garments (sleeves, smocks, coifs), both sides of the fabric showed. The reversible line was a practical necessity that became an aesthetic signature.
For modern stitchers, the discipline of the return journey teaches something no other stitch does: you must plan the route, not just the line. Experienced blackworkers map their path so the return journey flows without lifting the needle unnecessarily, it’s embroidery as route-planning, and it’s deeply satisfying.
The tension rule
Holbein stitch must lie flat — each stitch exactly filling its space, no gaps, no overlap, no pulling.
Uneven tension is brutally visible in blackwork because there’s no color or texture variation to distract the eye. This is the craft’s famous difficulty and its famous reward: it forces a level of stitch control that improves everything else you sew.
Materials
| Item | Traditional | Modern beginner |
|---|---|---|
| Ground | Fine white linen | 28-count evenweave or linen over 2 threads; 14-count Aida for first practice |
| Thread | Black silk twist | Stranded cotton floss (1–2 strands) or black silk floss |
| Needle | Fine sharp | Size 26 tapestry (blunt) for evenweave; sharp for linen |
| Color | Black only | Black to start; historically accents of red/gold existed, explore later |
Thread choice deserves emphasis: blackwork traditionally uses one strand or fine thread, the lines are delicate, and heavy thread makes patterns look clumsy. On 28-count evenweave over two threads, one strand of floss is standard. Resist the urge to use two “for coverage”, blackwork isn’t about coverage, it’s about line.
Pattern Logic: How Blackwork Designs Work
Blackwork patterns are built from small geometric units on the grid. Understanding the construction lets you read any chart and eventually design your own:
- The unit: a small motif (e.g., an 8-pointed star, a diamond, a stylized flower) charted on graph paper, typically 8–16 squares across.
- The repeat: the unit is tiled (mirrored, rotated, or simply repeated) to fill a band or field. The tiling is the design; a single unit repeated well beats a complicated unit placed poorly.
- Density as shading: solid-filled units read as dark masses; outline-only units read as light tracery. Alternating dense and open bands creates the rhythmic light-dark movement of classic pieces.
- Borders: geometric border patterns (zigzag, stepped, interlaced) frame fields. Borders are traditionally worked first, they establish the grid discipline for everything inside.
Start with a single band pattern — a repeating diamond or star border about 5 cm wide. It teaches the stitch, the counting, and the repeat logic in one manageable project.
Step-by-Step: A Blackwork Border Band
Step 1 — Prepare
Cut evenweave with generous margins. Find the center. Mount in a hoop, blackwork’s precision demands taut fabric. Thread one strand of black floss, about 40 cm.
Step 2 — Chart your unit
On graph paper, draw a simple 12 × 12 square unit: a diamond outline with a small star center. Mark your start point (bottom-left of the unit) and plan the route, the path your needle will travel out and back.
Step 3 — Stitch the first unit (outward journey)
Following the chart, work the running-stitch pass of the entire unit. Don’t worry about the gaps, they’re intentional. Keep every stitch exactly one grid unit long.
Step 4 — The return journey
Reverse direction and fill every gap. Watch the line become continuous, this is the magic moment of blackwork. Check the back: it should mirror the front.
Step 5 — Repeat and border
Repeat the unit along the band, keeping spacing exact. When the band is complete, step back: the pattern should read as a continuous rhythmic design, with no unit visibly “off.” If one is, unpick it now — in blackwork, one wrong unit spoils the rhythm of twenty right ones.
Beyond Black: Color and Texture Variations
Once the fundamentals are solid, the tradition opens up:
- Redwork/goldwork accents: historical pieces sometimes added red silk or gold thread details, a single accent color against blackwork is stunning.
- Shaded blackwork: using gray threads in multiple values to create true tonal shading, blackwork as grisaille painting.
- Contemporary colorwork: the Holbein stitch and geometric pattern logic work in any color; modern pieces use the technique with full palettes while keeping the disciplined structure.
- Fill patterns: beyond outlines, dense fill diapers (all-over tiny patterns) create rich textured fields, advanced, meditative, gorgeous.
Common Mistakes
| Mistake | Symptom | Fix |
|---|---|---|
| Uneven stitch length | Wobbly lines; pattern won’t tile cleanly | Count every stitch; one grid unit per stitch, no exceptions |
| Pulling too tight | Fabric puckers; lines look pinched | Lay stitches flat; blackwork tension is gentle |
| Skipping the route plan | Excess thread carries on the back; tangles | Plan out-and-back paths before stitching |
| Thread too heavy | Clumsy, blobby lines | One strand on fine grounds; let the line be delicate |
| Inconsistent units in a repeat | Pattern rhythm breaks visibly | Chart once, stitch from the chart every time; unpick deviants |
Care and Framing
Blackwork’s high contrast is its vulnerability: white grounds show every mark, black thread can crock (rub off) onto the ground if it’s not colorfast.
Pre-test black thread by rubbing a damp white cloth over it, if color transfers, choose another thread. Wash finished pieces gently in cool water; press face-down on a towel. Frame behind glass with acid-free matting — blackwork is graphic art and deserves the presentation.
Takeaways
- Blackwork = geometric counted patterns in (traditionally) black on white, shaded by stitch density.
- The Holbein stitch (double running stitch) creates a reversible line, plan your route out and back.
- Precision is the craft: even stitch length, gentle tension, exact repeats. No hiding places.
- Use fine thread (one strand) on evenweave or linen; let the line be delicate.
- Master the monochrome discipline first, color variations come after, and they’ll be better for the wait.
Related guides
Cross-Stitch Basics — for cross-stitch, another counted-thread technique; Zardozi Embroidery: Metallic Thread Mastery — for zardozi.
Frequently Asked Questions
Is blackwork only done in black?
Traditionally yes, the name is literal. But the technique (Holbein stitch, geometric counted patterns) is color-agnostic, and historical pieces did include accents. Learn in black; the discipline transfers to any palette.
What’s the difference between Holbein stitch and backstitch?
They look similar on the front, but backstitch leaves visible carried threads on the back, while Holbein (worked as running stitch out and back) produces an identical clean line on both sides. For reversible or sheer work, Holbein is the correct choice.
Can beginners really do blackwork?
The stitch is just running stitch, utterly beginner-accessible. The challenge is consistency, which is a practice skill, not a talent. A patient beginner’s border band looks genuinely good; the craft rewards care more than experience.
How do I design my own blackwork patterns?
Graph paper and symmetry. Draw a small unit, tile it four ways (repeat, mirror, rotate), and see what emerges — the tiling often creates secondary patterns you didn’t plan. That’s the traditional discovery process, and it still works.
Why does my black thread bleed onto the white fabric?
Some black dyes crock (rub off) or bleed when wet. Always pre-test: rub with a damp white cloth, and soak a stitched scrap. If it marks, switch brands, colorfast black floss exists, but not every black on the shelf qualifies.


